Thursday, July 5, 2012

Fourth of July Thin Mint Cake Pops

Cake Pops...they are all the rage right now! My first attempt was not so hot though. I put WAY too much frosting in the cake pops and they were mushy and wouldn't stay on the stick. So a couple of weeks later I tried again, this time using an idea my very clever friend came up with. She is a Girl Scout mom as well and had lots and lots of leftover Thin Mints that she didn't sell. So she made cake pops with them. How do you do this, you ask. It was very simple and a very big hit!! And I didn't mess up this time!
You will need:
1 box of Girl Scout Thin Mint cookies
2 ounces of cream cheese (I used 1/3 less fat)
Melted white chocolate chips
Sprinkes and gel frosting decorating tubes
Candy sticks
Foam flower decorating bars

First you will need to crush the cookies into crumbs. I did it with a gallon size zipper bag but you could use a food processor if you wanted to. After you have crushed the cookies, add them to a medium bowl and add the cream cheese. You don't have to soften it because you will work the crumbs and cream cheese together with your hands. Once you have a consistency you can mold, you are ready to make the balls. I worked them into about 2 inch balls and refrigerated them for about 30 minutes to get them hardened just a bit. Meanwhile, melt your white chocoalte chips. You could use whatever kind of chips you wanted...chocolate, white, butterscotch...I used white to go along with my 4th of July theme. I used my little Wilton choclate melter but you could put them in the microwave or melt them over a double boiler as well. After you take your balls out of the fridge, insert your cake pop sticks (candy sticks) into the pops and then dip them into the chocolate. Immediately sprinkle your decorating sprinkles on top and mount them onto the foam flower blocks. Then put them back into the fridge for another 30 minutes to harden the chocolate. At this point you can decorate them however you want. I found my metal container at Michaels - it is really a silverware holder. I put the foam blocks inside the silverware compartments, added some checkered wax paper (also from Michaels) and wound some wire garland around the middle. I think it turned out so cute!!

I was thinking you could probably do this for any kind of cookie you like. I have some Girl Scout Do Si Dos that would go great with peanut butter chips. The possibilities are endless!!

Have fun!!


Saturday, June 16, 2012

Father's Day Gifts

I spent the entire morning making Father's Day gifts. Well, actually, only one thing was a gift for my husband and the other two things were more of a tribute to him.

This is the basket of goodies I made for the hubby. I bought a black metal bin on clearance at Target and put socks, underwear, K-cups, Clif Bars and razor blade refills (those darn things are so expensive!) in it. On the bin itself I cut the vinyl word "Daddy" on my Silhouette (shape "Daddy title" from the online store) and adhered it to the bin. THAT was the easy gift!! I think he'll love it!

A few days ago I saw a post on the Silhouette blog for the cutest darn heat transfer t-shirt for a daughter to wear to honor her daddy on Father's Day. Being that I have two daughters I thought this was a super idea...hence the tribute project. This was not as easy as I thought it would be. First of all, I was using dark printable heat transfer and the tutorial is for light -- two TOTALLY different things. I know...strange. One you mirror image and the other you don't. I didn't actually screw that part up but I did have to think about it a little harder! Second, intricate designs are NOT compatible with dark printable heat transfer. Well, maybe for some people they are, but I am not one of those people! So I modified my image somewhat. If you are looking to do the same type of project, follow the tutorial but DON'T mirror the image. Aside from that, I pretty much did the same thing for my t-shirts. The design is from the Silhouette online store - "dad heart frame" - and I cut away the more intricate part of the design and this was the end result.

The kids love them and I think he will be so happy when he sees the girls in their shirts!
Happy Father's Day! :)

Friday, June 8, 2012

I'm Baaacccckkkk! And I have a new Silhouette project to share!

My last day of school was Wednesday! Words cannot express the happiness I feel about not having to work for the next 9 weeks!! My summer list is usually long...cleaning out closets, cleaning out cabinets, touching up painting in the house, etc...but I have lots of time to just chill out and recharge.  I really need it after this school year!! I am really looking forward to cooking and baking and creating. And of course going to the beach, going to to the water park, going to the movies and bowling. Life is good!

It has been baby central at work this year. I think 7 teachers had or will have babies at some point over this last year. Despite my end-of-year craziness, I was able to make something special for one young lady who is due at the end of July. I LOVE the cute little onsies I have seen on Pinterest. I made some of the ideas my own for this gift. All of them were cut on my Silhouette. I know the picture doesn't show the colors that well (it was 10:00 at night) but they are green, blue and black designs. I am so pleased with how they turned out! The first onesie is just two fonts cut on my machine -- Arial and Baby Huffy -- cut on blue and green flocked heat transfer from Expressions Vinyl. The second is the design "assorted moustache set" from the Silhouette online store, cut on regular black heat transfer also from Expressions Vinyl, and the third is the design "neck ties," cut on green flocked heat transfer. She loved them! :)

So I packaged them up into a little gift basket with a few other necessities and Wa-La...

Have a great Friday!!

Wednesday, March 21, 2012

No I haven't fallen off the face of the Earth...


Can I just tell you how much I wish summer break was here?? I know there are plenty of moms out there that are not nearly as excited as I am. But they are probably not teachers! :-) We still haven't even made it to Spring Break yet! Plus I have a very busy 4th quarter as one of the senior class sponsors...Grad Bash at Universal and then graduation. But I do see the light at the end of the tunnel and then I will be posting a lot more!

So today I decided to post because I just made the easiest, tastiest dinner! Talk about an easy weeknight meal! I think I will call it Spicy Garlic Cream Shrimp...hmmmm... Cook up some rice and steam some edamame and you have a great, well-rounded, delicious meal!

Spicy Garlic Cream Shrimp

1 1/2 lb large peeled deveined shrimp
1 tub Philadelphia Garlic Cooking Cream
1 can Rotel tomatoes
1 tsp Greek seasoning
2 Tb olive oil

Preheat a saute pan and add the olive oil. When the pan gets hot add the shrimp and sprinkle with the seasoning. Cook until the shrimp are opaque and then add the cooking cream and can of Rotel. Cook until heated through. Serve over rice.

That's it...how easy can it get right? I hope you enjoy it!! :-)

Sunday, February 5, 2012

Superbowl Chocolate Dipped Football Strawberries


This might sound strange but this is the first year we've gone to a Superbowl party in a while. And quite honestly, part of my husband would rather stay home and watch it on his own TV in his comfy chair and pause it or rewind it whenever he wants. But I know we'll have fun at our party and so does he. One of the things I made is a 7 layer dip. Refried beans mixed with half a package of taco seasoning, guacamole, 16 oz of sour cream mixed with the other half of the taco seasoning, 16 oz "real" deli salsa, 2 cups of shredded cheddar, tomatoes and sliced olives...in this order. I cannot wait to eat this!! :) These strawberries are the other thing I made...my creative side coming to the party. I can't take all the credit though...I did see this idea somewhere else...I just can't remember where!

It was super easy. I melted almost an entire package of Wilton dark chocoate candy coating pieces and dipped about a quart of strawberries (washed and dried thouroughly) in the chocolate. I let them cool and harden in the fridge for about 30 minutes. Meanwhile I melted about 1/3 of a package of the white Wilton candy coating chips. I put the melted chocolate into a small zipper baggie and cut a little slit in the corner and piped the white chocolate onto the strawberries to make little footballs. Mine are not quite as professional as the ones I saw but I think they'll do! :)

Have fun at your Superbowl gatherings!!

Saturday, January 28, 2012

Valentine T-Shirt Tutorial


Ahhh...another holiday to create stuff for! Whoo hoo! :) I have so many plans...  Anyway, today's project, the first of my valentine projects, is this rhinestone and heat transfer t-shirt. I thought I would walk you through it. First I cut out my heat transfer material with my Silhouette Cameo. Today I used Silhouette brand smooth red heat transfer vinyl. I used the settings that my Cameo calls for for flocked vinyl. My Cameo seems to need the blade bumped up on almost everything I cut. Yours might be different so always do a test cut first.

I used 2 shapes in this project. The heat transfer is "heart_tree_C01483_23067". I loaded my media into my Cameo and cut it.

After it comes out of the machine, carefully peel away the material you are not using.
You are left with your heat transfer. Something you need to note, since the tree looks the same whether it is flipped as a mirror image or not, I DID NOT mirror image it in the software. If you had words or something similar, you will want to flip your image horizontally. You do this because you have to flip the image over when you iron it on. Very important!

I put the tree aside and next cut the rhinestone template. For this I used the shape "rhinestone_xoxo_C20091201142706_18816". I do not use the Silhouette rhinestone template material. This is not because I don't like it...I actually prefer it. It is thinner and peels right off the backing with the holes cut perfectly. Problem is, it's expensive compared to thicker rhinestone material that you can get online. This adds a step for me. I set my Cameo settings pretty high -- blade is set to 8. But the holes don't pull off the backing and I have to poke them out almost one by one. If you have the Silhouette rhinestone material you definitely want to use it! I'm cheap!

So load your media and cut your template material.
 When it comes out it looks kind of like this. I then have to punch most of those holes out. Not so with the Silhouette template material...
Then you place it on the backing board.
Next, sprinkle your rhinestones on the holes and move them into place with the brush. You will have to pick up the remaining rhinestones and place them into the holes.
When you are finished with the rhinestone placement it will look something like this.
Next you will place your rhinestone transfer paper over the rhinestones and carefully pull up the paper.
I wanted to make sure I had everything arranged the way I wanted it before I ironed it all down.
I placed the ironing paper over the design and pressed firmly with the iron for about 30 seconds in each spot until I had iron down the entire design.
Carefully pull off the transfer paper to reveal your design. You may need to re-iron stubborn spots.
So now we are finished with the heat transfer portion of the shirt. Onto the rhinestones...
You pretty much do the same thing you do with the heat transfer...place it where you want it on the t-shirt face-up. Press the iron firmly on the design for about 30-45 seconds. Slowly peel off the transfer paper to reveal your design. I added a few extra rhinestones to the tree for some added bling! :)
You are going to want to flip the shirt inside out and iron the back of the design to be sure it is on there good. Flip it back and you are finished! Ta da! :)
Next is treat boxes...stay tuned...

Thursday, January 26, 2012

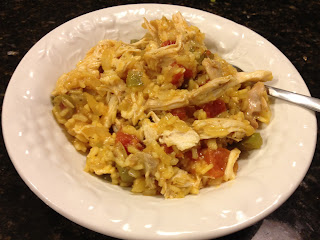
Spanish Chicken and Rice

My mother-in-law had a friend who made the most amazing Spanish chicken and rice dish. Whenever she made it I raved about it. She wrote it down for me since she knew I loved it so much. Unfortunately, she passed away a few years ago but she still lives on in her delicious dish. I made it tonight and as always, enjoyed it immensely and ate too much!

First, dice up a whole large green bell pepper, a large sweet onion, a clove of garlic and one stalk of celery.
Heat a couple of tablespoons of olive oil in a large dutch oven and add the diced veggies. Saute the veggies for about 5 minutes, stirring frequently. Next add one cup of rice, a 14 oz can of diced tomatoes, a tablespoon of chicken base, a pinch of sazon goya, 1/3 jar of sofrito, 1/3 jar of recaito, 2 bay leaves and 1 1/2 cups of water.
Bring to a boil, then cover tightly and reduce heat for about 30 minutes, until rice has cooked through. When rice has finished cooking, add about 2 cups of shredded rotisserie chicken and about 10 sliced Spanish olives and heat through.
Serve with a salad! Yummy!!

Spanish Chicken and Rice

Ingredients
2 T olive oil
1 large green bell pepper, diced
1 large Spanish onion, diced
1 stalk of celery, diced
1 clove of garlic, chopped
2 bay leaves
1 cup rice
1/3 jar sofrito
1/3 jar recaito
14 oz can diced tomato
1 T chicken base
1 pinch sazon goya
1 1/2 cups water
Handful of Spanish olives, sliced
2 cups shredded rotisserie chicken

Directions
In a large Dutch oven heat olive oil. Add the vegetables and saute about 5 minutes until soft. Add rice, tomatoes, sofrito, recaito, chicken base, sazon goya, bay leaves and water. Bring to a boil and then cover tightly and reduce heat to simmer for about 30 minutes, or until rice is done. Then add the olives and chicken and heat through. Serve.

I hope you all enjoy this recipe as much as I do!